Sunday, January 11, 2015

DIY Sunburst Mirror

Hey guys!!! It's been a while since I've been able to blog/craft/breathe... Nursing school took over my life full force, so all crafts have been put on the back burner. Luckily I found some time over Christmas break to do some crafting.


I've been perusing Pinterest and am in love with just about any and every sunburst mirror out there. I came across this one and fell even more in love. The directions were a little vague, but I figured I could make it work.

I hit up hobby lobby with my gift card my cousin got me for Christmas (Thanks Nathan for contributing to my habit/hobby).

Supplies
1 10" round Mirror $9.99 with my 40% off coupon
12 3/8" dowel rods $0.59
12 1/4" dowel rods $0.59
1 pack of 1/8" dowel rods $2.97
4 packs of assorted mirrors $2.97
hot glue/glue gun
gold spray paint $5.99
miter saw

I ended up spending about $35 for this project and didn't end up using all of the dowel rods.

-------------------------------------------------------------------------

Using my hubby's miter saw,
I cut the 1/4" dowel rods in half and made them 18" long
1/8" rods 15" long
3/8" were pre-cut and were 12" long.


I glued the rods to the backing of the mirror. Placing my largest rods first at 12:00, 3:00, 6:00 and 9:00. and then placed 5 rods in between each of the quarters for a total of 24 rods. 

Then I alternated 12" and 15" in between each of the larger rods. I chose to do this because of the smaller mirrors I was going to add to the end of each rod.


Before I glued the smaller assorted mirrors on the ends of the dowel rods, I hit it all with a coat of gold spray paint on both the front and bottom side.


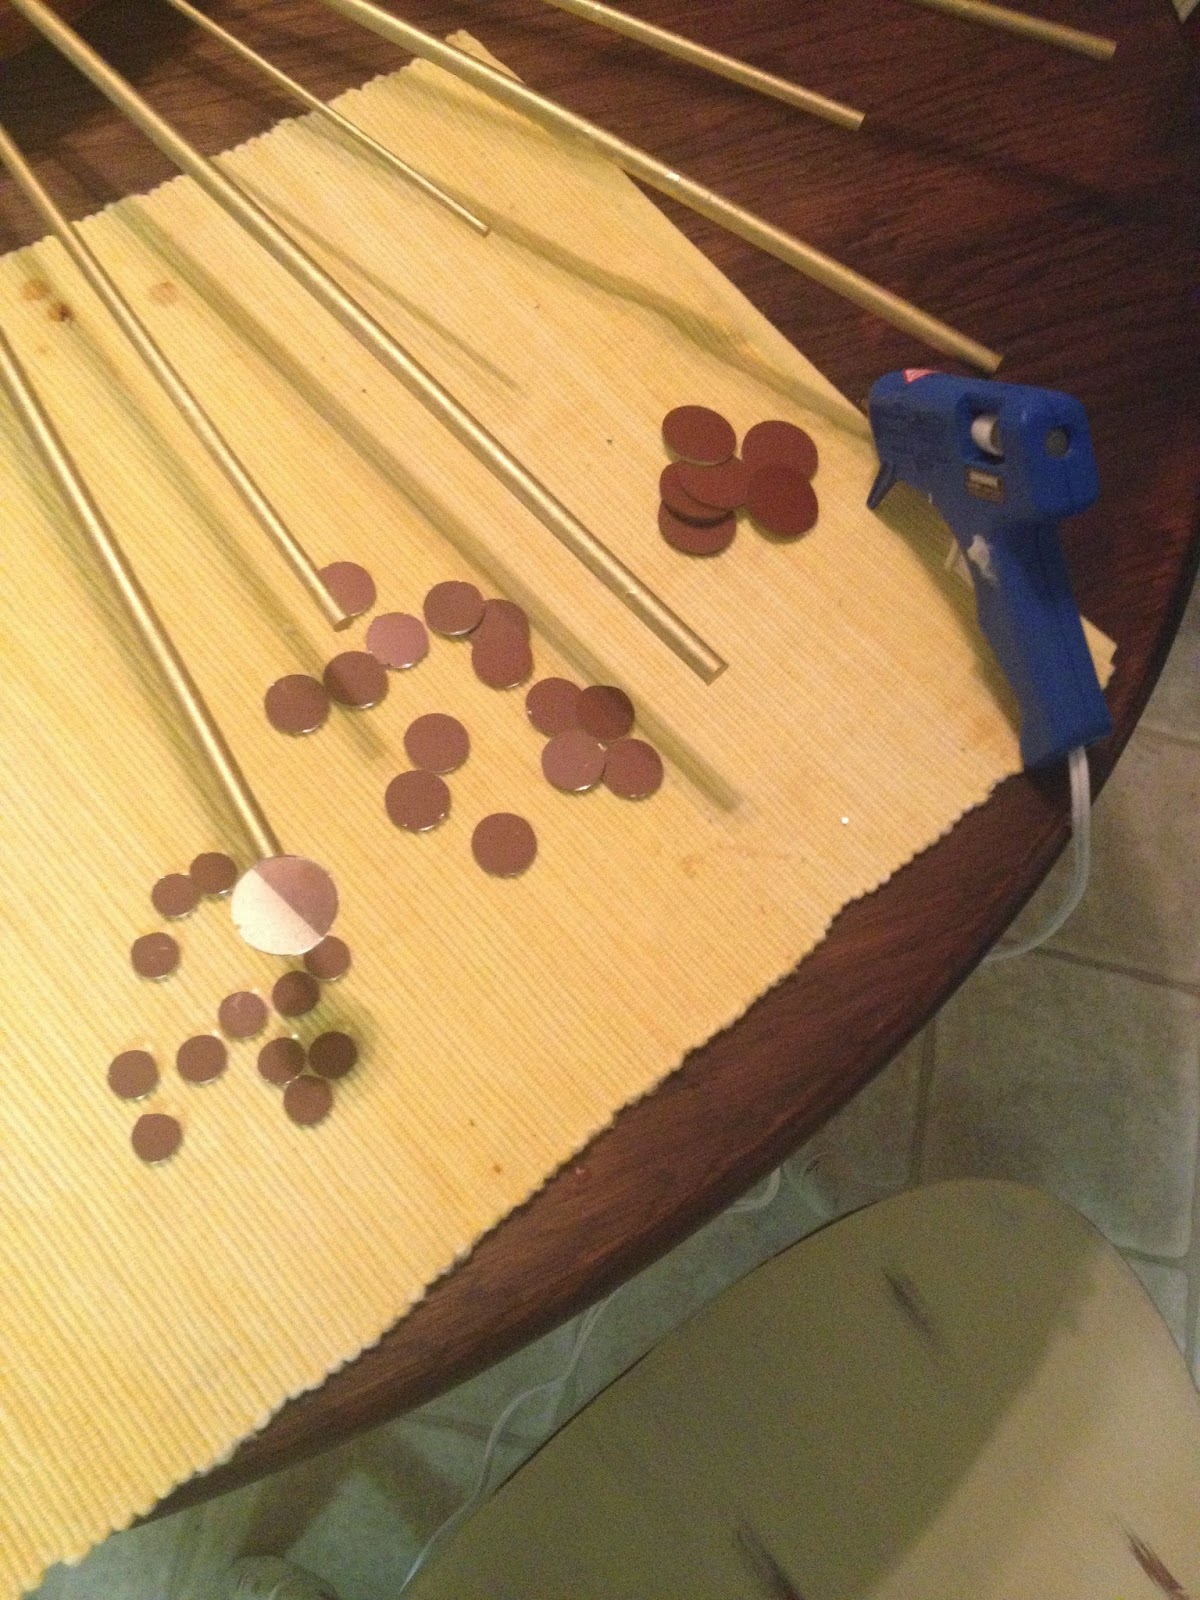
My lazy Susan was clutch for this part!!!


I love how this looks in our bedroom so much more than the white mirror before!!! Everything I used to decorate our dresser with was recycled from somewhere else in our house.


The chess set use to belong to my Gramma, I thought it was the neatest thing and like the diversity it adds to the decor. I bought some art off of ETSY like 3 years ago and as an added gift she added the Wanderlust piece. I just now got around to putting it in a frame!


I'm loving the sun burst so much more than the plain white mirror. It really fills up such a big blank wall. And the lamp adds some more dimension to the dresser. I'm bouncing around the idea of a new lamp shade, maybe even a thicker based lamp, who knows. My house is always changing.


After:


Hope you guys like it! 

XOXO,


Friday, March 28, 2014

Card Catalog inspired table

I found this table online and the second I saw the drawers I knew I had to have it!


This abused piece of furniture took a lot of sanding, putty and paint to go from drab to fab!!! The carvings the previous owners dug into the wood were really deep and I had to putty them because sanding it down would have taken forever.


It only too two coats of paint and a light sand to give this piece a sleek finish. I took my Valspar Woodlawn Valley Haze paint that I painted my living room with to Lowe's where I got it from, and asked if they could re-tint it for me.

The guy working the paint section was very nice, and lightened the paint about 4 shades. 


I ordered 6 vintage card holder pulls from this antique hardware store in Portland, OR and put them on the drawer fronts to give the illusion that instead of just two drawers, there were 6.


I'm so happy I went with the antiqued brass, I love the way it blends with the light green color of the table! With just a level and a impact drill, I put all 6 pulls on evenly by myself!


Thanks for reading!!
xoxo
 

Wednesday, March 26, 2014

Measurable Memories

I am so thrilled to brag that I'm going to be an Aunt! My oldest cousin is pregnant with the first Great-Grandchild of the [Cunning]Ham-Fam. We celebrated the little guy this past weekend and I couldn't post my latest creation until I presented it to the Mommy to be!

Growing up, my mother tracked our growth on the door jam of her closet. Looking back on it, if they ever moved those memories would be lost forever! So I decided to make what I'm trying to market at this years Fall Fest "Measurable Memories"

 -----------------------

I started with pre-cut 6' poplar wood and stained it with my Kona stain.


 I used vice grips and a wash cloth to clamp down my measuring tape to make sure everything was equally measured.


I marked off each quarter inch, half inch, 6" and 1', 2/16  on either side to make sure that the line was bold enough.


Andrew helped me pre-drill holes for the numbers and screw them on.


I decided I liked the numbers running horizontal instead of vertical.


This one is a little dark in the picture, but the stain matches the wood and furniture in their house!


I am currently taking orders for customizable growth charts. Colors available are, grey, turquoise, red, white and stain. Number colors include white, silver and black.
With 15 different color combinations there's lots of options!
Only $45.00

Leave you comments below if you're interested in a Measurable Memory!

Little baby Taylor is expected to be tall just like mommy and daddy, I hope in 18 years 6.5' is tall enough to continue to track his growth!

I love you already,
xoxo, AUNT

Vintage Buffet

Let me start by saying and giving credit to Andrew on this project! He sucked it up and helped me turn this old ratty buffet into a beautiful feature piece.


We were both on the same page when it came to getting rid of the mirror front and changing it out for chicken wire which he bought a roll of from Lowe's for $15. Worth the price considering how much we got and how many other projects we will be able to use it for. 


We started with Paris Grey Annie Sloan chalk paint and Old White for the drawer face and the cabinet door frame. 


We used his air compressor to use the staple gun. It saved a ton of time using the staple gun instead of doing it individually with a hammer.

I painted the hardware to match the Old White on the drawer fronts. I love the contrast between the grey and white. It really pops and would go with any color scheme.


This piece is for sale, as I am running out of room in my house for all my projects! Just let me know if you're interested :)

As always, xoxo


Great-Grandmas 1930's Vanity

This is by far one of the most beautiful transformations I have done thus far. I am especially happy about this project because my mom helped me!

We are going to display this vintage family heirloom at my wedding reception where we place wedding photos of our parents and grandparents wedding days. (I will post the pictures when it all comes together on wedding day).

This piece was in my parents upstairs bonus room housing a tv, playstation and other junk! It wasn't given the justice it deserved for being such a wonderful piece.


We chose to paint the whole piece in Paris Grey chalk paint, and really extenuate the drawers and hardware with Old white. 
With the two of us knocking it out, we got the main portion done before dark!

 
To finish it up, we decided to paint the mirror spokes grey, and the frame of the mirror in white!

Here is a sneak peak of what's to come Aug 2, 2014!!! Pictured on the right (though hard to see) are my grandparents on their wedding day, and a picture of my great grandmother (who's vanity this is) as a toddler on the left.


Thanks for stopping by! xoxo


Tuesday, February 18, 2014

Filling a Blank Wall!

I knew decorating this house exactly how I want it was going to take time. 

A while back I purchased some assorted blank cards from Rifle Paper Co. They have been sitting in my spare bedroom for weeks. I knew what I wanted to do with them, I just hadn't gotten around to it. But last week our weather forecast was calling for snow, and I couldn't stand looking at the bare wall in my living room anymore.


I headed off to my little piece of heaven aka Hobby Lobby and did some shopping. 

I had amazing luck that day, because all picture frames were 50% off. I purchased four 8x10 simple black frames.


I took the leftover paint I had from Lowe's that I used to paint my coffee table with and my all time favorite sponge brush and painted the frames.


This paint is phenomenal. By the time I finished painting the first coat on all four frames, the first frame was already dry and was ready for a second coat.


I like a rustic and used look, so I let a little of the black come through.

I also bought four 5x7 and four 4x6 off white mats to go inside of the frames. My cards are only 4x6 and I because I had such a large blank wall to fill I opted for the 8x10 frames! The bigger the better!


I placed the card inside the small mat and taped them together so that they wouldn't slide around when I put the glass back in the frame and started moving them all around.


When I checked out at Hobby Lobby they wrapped all of my frames in packaging paper. Since it was cold as Antarctica outside, I laid out the paper so that I could paint in my living room next to the fire!

Once I was sure all of the paint was dry. I had a revelation. I went and got my hammer, nails, level and tape measure from the garage and flipped all of my frames over right there on the table.

I then measured 2" in between all the frames and leveled it out to make sure they were all in the straight line. (I'm really excited about this part). I then took some of the packaging paper and laid it right on top of the frames as they laid on the coffee table.


I took a pen and marked where the nails needed to go. Then transferred the paper from the table to the wall.


I double check my pen marks with the level to make sure the frames were going to hang even. Bang bang bang, put all four nails in the wall, carefully ripped the paper down 


 All in all, I spent around $40 for this project. The cards themselves were the most expensive part. But for the amount of space this takes up on such a bare spot of the house I enjoy it. Plus it gave me something to do while school AND work were canceled. 


Monday, January 20, 2014

Vintage Wine Buffet

A while ago, when I purchased my French Provincial dresser off of Craigslist, I also bought a depression era buffet from him as well. It was in rough shape and needed some serious attention. The top was peeling off and just looked awful. We tried to peel of the rest of the laminate, but it wasn't happening. We were going to have to replace it completely. This thing sat in our carport for months before I finally got around to tending to its needs. From all the rain we had this winter, the top (which needed to be replaced anyways) warped, and just reiterated the fact that it had to go.


This past Friday I came down with the crud and felt pretty awful all weekend. Andrew did a fantastic job of taking care of me. He managed to get me to walk around Lowe's with him just long enough to pick out the router bit I wanted to shape the new top we had to put on the buffet. It took the life out of me to leave the house for a few hours, so while I slept for 3 hours, he got to work!


He did such an amazing job! I'm so proud of him, because for a first time router user, it turned out exactly how I wanted it to. I wasn't up for any kind of DIY this weekend, so we moved it into our mud room to get it off the carport and out of the weather.


I knew what I wanted to do to this piece, it was just a matter of getting around to it. When we went to pick out paint for our kitchen table, I went ahead and bought Annie Sloans Emperor's Silk RED! The red came from the wine inspired canvas Andrew got for a STEAL at Kirkland's. Originally $184 marked down to $23. That's right TWENTY-THREE!

I finally started gaining some energy back and managed to lay out my drop cloth in my now favorite winter time place to paint; my kitchen. I did some light sanding with some 220 grit paper just to smooth out some of the wood.

I started with the drawers and was loving the way the wood came through just one coat of paint. It looked distressed without me having to go back and rough it up.


I saved the top for last. I knew, since the top was newer/different type of wood, it would take the paint differently. I didn't want to leave it natural or stain it. So I crossed my fingers and laid on the first coat.


It was much brighter, but I wanted to give it time to dry, plus I had burnt myself out and needed to take a couch break. While I plopped on my couch I was racking my brain on what I wanted to do. I decided not to do a second coat and go ahead with my dark wax.


I started with the edge (which you can see the detail of the routing Andrew did really well in this picture) and really liked how the grain showed up more.


The technique I made up as I went along when it came to waxing the top went like this. Dip my rag  two-three fingers deep in the wax. Then I skipped and made 5-6 quick marks going with the grain. Then I spread these out along the top remembering to go with the grain. Making some areas dark and others light letting the bright red shine through.


To my surprise, the wax stained the top to match the rest of the piece almost perfectly! I love it!


We are on the hunt for the perfect drawer pull for the center drawer, but haven't come across it yet.

This piece really adds a pop of color to the bland room. Here's the finished decorated Wine Buffet!


In the top center piece, the red on top of the wine bottle was the inspiration for the red!! This is the $23 canvas I was talking about


Next up! WALL PAINT 
What color do you think would look best based off of the pieces in this room?


xoxo